What is VPNaaS (VPN as a Service) in OpenStack?
VPNaaS (VPN as a Service) — is a virtual private network service provided within the OpenStack project. It allows users to create secure connections between different network segments or between remote devices over the internet using VPN protocols such as IPSec (Internet Protocol Security) and SSL/TLS (Secure Sockets Layer/Transport Layer Security).
Here are a few examples of what VPNaaS (VPN as a Service) in OpenStack can be used for:
1) Ensuring Secure Data Transmission: VPNaaS allows establishing secure connections between different network segments or between remote devices over the internet, ensuring data encryption and protection from unauthorized access.
2) Ensuring Confidentiality and Privacy: By creating virtual private networks, VPNaaS ensures the confidentiality of transmitted data, which is especially important for organizations working with sensitive information.
3) Expanding Network Capabilities: VPNaaS allows expanding the network capabilities of the OpenStack infrastructure by providing the ability to create virtual private networks between different areas or resources.
4) Access Management and Authentication: VPNaaS provides access management and user authentication tools, allowing configuration of access and identification rules to ensure data security.
VPNaaS is fully integrated into the OpenStack ecosystem, ensuring compatibility with other OpenStack services and tools, such as Identity service (Keystone) and Networking service (Neutron).
VPNaaS has scalability capabilities, allowing the service to be adapted to the needs of your organization, ensuring reliable and efficient operation under changing loads.
VPNaaS provides an API for programmatic management and also integrates with the OpenStack Dashboard for convenient visual control and VPN settings management.
Thus, VPNaaS in OpenStack is an important tool for ensuring a secure and flexible network infrastructure, allowing users to create secure virtual networks and connections between various resources and devices.
How to Deploy VPNaaS in OpenStack and Securely Connect Instances from Different Subnets:
A simplified scheme for creating a secure tunnel between two OpenStack instances looks like this:
Step 1: Setting up the VPN Service
Log in to the OpenStack Dashboard (Horizon).
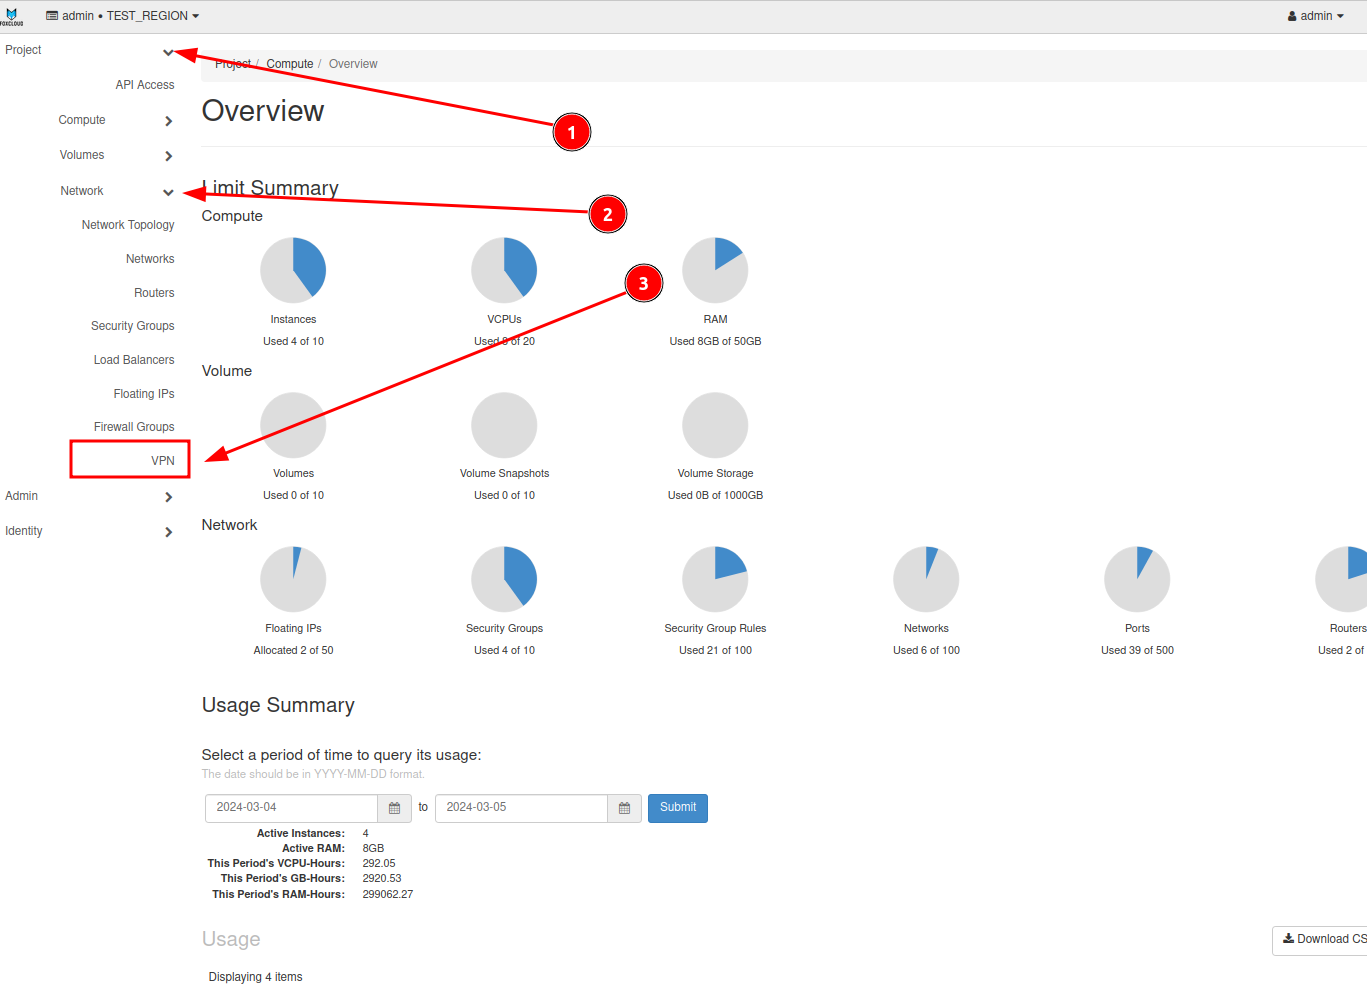
Go to the "Network" section and select "VPN".
Create a new VPN service by selecting appropriate parameters, such as routers and subnets for each end of the tunnel.
Step 2: Setting Security Parameters
Define security parameters such as encryption and authentication algorithms for IKE (Internet Key Exchange) and IPsec (Internet Protocol Security) policies.
Step 3: Creating Endpoint Groups
Create endpoint groups for the local and remote subnets you want to connect.
Step 4: Creating the IPsec Connection
Configure the IPsec connection by specifying parameters such as VPN service, endpoint groups, security parameters, and peer identification.
Step 5: Checking and Activating the Connection
After configuration, ensure that the IPsec connection is created.
Check the connection status. It should be "Down" until the connection is activated.
Step 6: Establishing the Secure Tunnel
Repeat similar steps to configure the VPN on the other end of the tunnel.
When both ends are configured, the connection status should change to "Active," indicating a successful secure tunnel between instances from different subnets.
We will show examples of how to go through each of these steps. In the first example, we will create a secure tunnel between two instances from different subnets in the Horizon management panel. In the second example, we will configure a tunnel between an instance and a local MikroTik.
Creating VPNaaS and Setting Up a Secure Connection in OpenStack Horizon.
You can link instances from unrelated cloud infrastructures through a VPN.
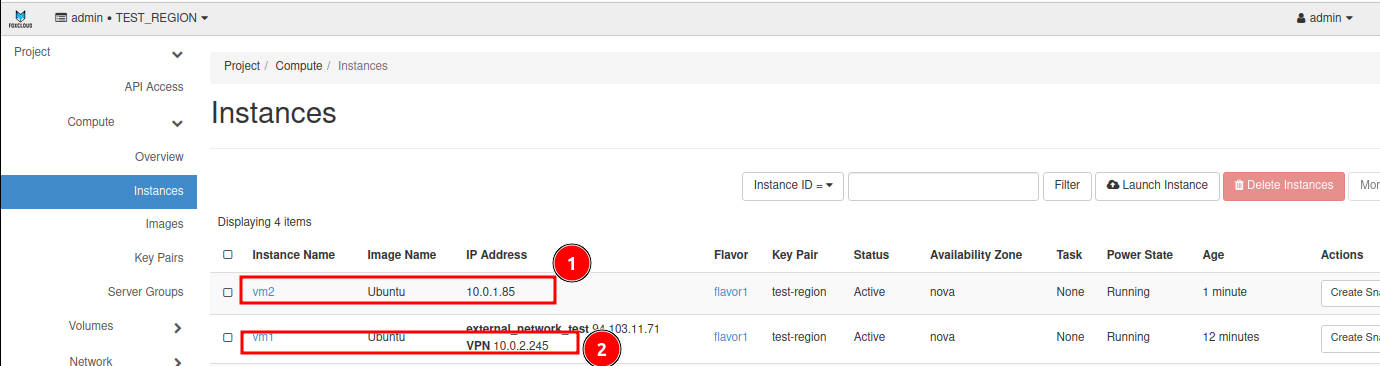
For our example, we will need two virtual machines: one in subnet R1, and the other in R2.
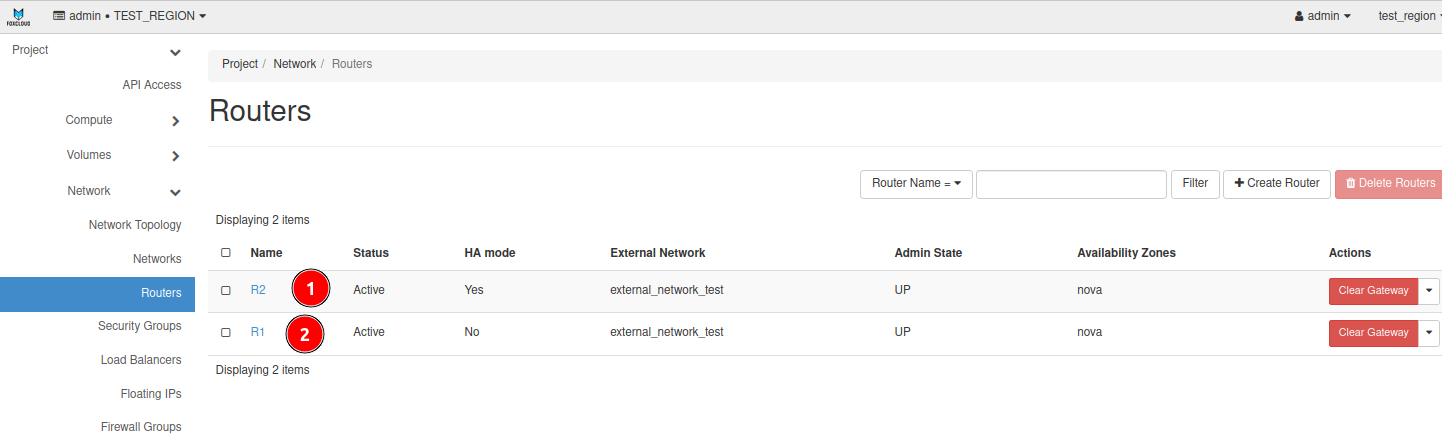
We also need two routers, one for each subnet.
Before creating the VPN, log in to Horizon with your user credentials and prepare the instances (if they are not already created)
For more details on how to log in to Horizon and create instances in OpenStack, refer to the article: How to create a virtual server in the Horizon Openstack control panel
Step 1: Creating the VPN
Log in to the OpenStack Dashboard (Horizon) with your user account and click on the "Network" tab in the main menu, then select "VPN".
Now proceed to create the connection between the two subnets.
We already have 2 virtual machines, one in subnet R1, the other in R2, and 2 routers, one for each subnet.
Step 2. Configuring the IKE Policy.
Use the following parameters:
- Name ikepolicy
- Authorization algorithm sha1
- Encryption algorithm aes-128
- IKE version v1
- Lifetime value for IKE keys 86400
- Perfect Forward Secrecy group5
- IKE Phase1 negotiation mode main
Step-3. Configuring the IPsec Policy.
Use the following parameters:
- Name ipsecpolicy
- Authorization algorithm sha1
- Encapsulation mode tunnel
- Encryption algorithm aes-128
- Lifetime value for IKE keys 3600
- Perfect Forward Secrecy group5
- Transform Protocol esp
Configuring the Necessary Parameters for Subnet A (R1)
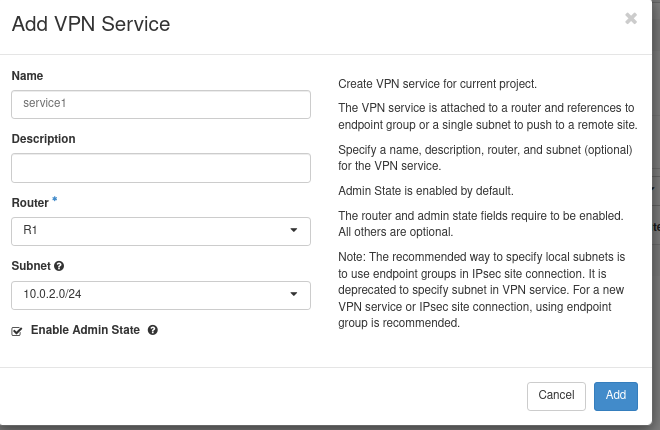
Step 4A. Configuring the VPN Service.
Use the following parameters:
- Name service1
- Router select the router from the cloud project R1
- Subnet 10.0.2.0/24
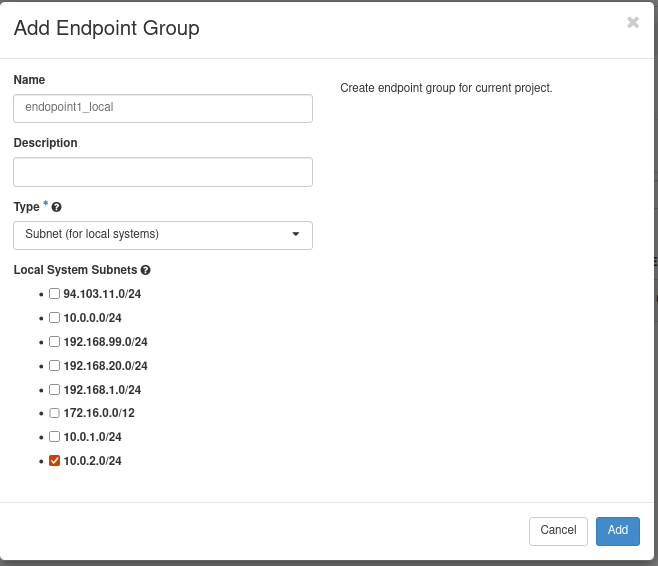
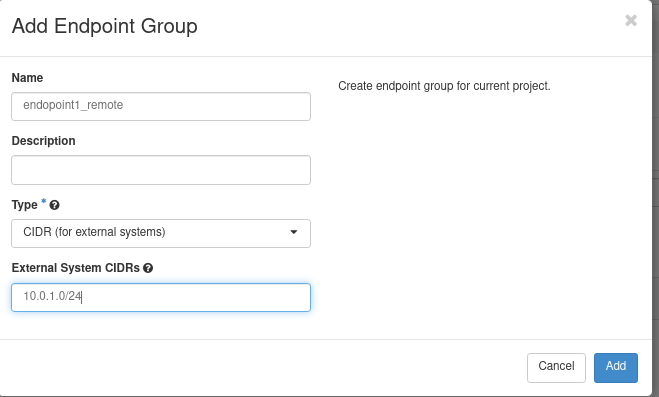
Step 5A. Configuring the Endpoint Groups for R1. Use the following parameters:
- Endpoint group name Type Value
- local1_epg SUBNET 10.0.2.0/24
- remote1_epg CIDR 10.0.1.0/24
Step 6A. Configuring the IPsec Site Connection. Use the following parameters:
- Name ipsecsiteconn1
- VPN service associated with this connection service1
- Endpoint group for local subnet(s) local1_epg
- IKE policy associated with this connection ikepolicy
- IPsec policy associated with this connection ipsecpolicy
- Peer gateway public IPv4/IPv6 Address or FQDN 94.103.11.89 (Public R2)
- Peer router identity for authentication (Peer ID) 94.103.11.89 (Public R2)
- Endpoint group for remote peer CIDR remote1_epg
- Remote peer subnet 10.0.1.0/24 (Local R2)
- Pre-Shared Key (PSK) string secret
- MTU 1500
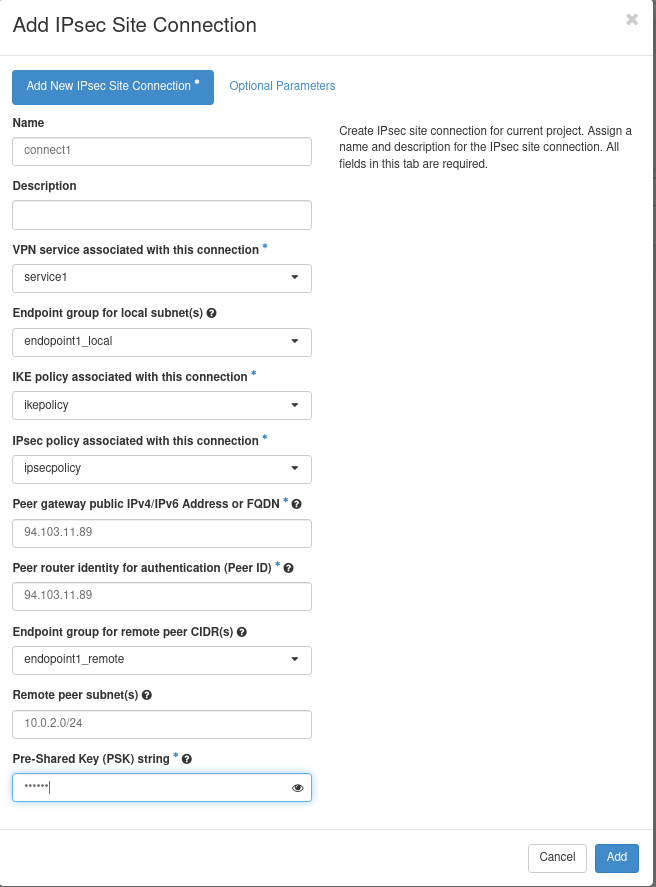
After these configurations, the "IPsec site connection" will be successfully created and have the status "Down." When the tunnel is set up on the other side and successfully raised, the status will change to "Active."
Configuring Subnet B (R2)
Step 4B. Configuring the VPN Service. Use the following parameters:
- Name service2
- Router: select the router from the cloud project R2
- Subnet 10.0.1.0/24
Step 5B. Configuring the Endpoint Groups for R2:
- Endpoint group name Type Value
- local2_epg SUBNET 10.0.1.0/24
- remote2_epg CIDR 10.0.2.0/24
Step 6B. Configuring the Endpoint Groups for R2. Use the following parameters:
- Name ipsecsiteconn2
- VPN service associated with this connection service2
- Endpoint group for local subnet(s) local2_epg
- IKE policy associated with this connection ikepolicy
- IPsec policy associated with this connection ipsecpolicy
- Peer gateway public IPv4/IPv6 Address or FQDN 94.103.11.88 (Public R1)
- Peer router identity for authentication (Peer ID) 94.103.11.88 (Public R1)
- Endpoint group for remote peer CIDR remote2_epg
- Remote peer subnet 10.0.2.0/24 (Local R1)
- Pre-Shared Key (PSK) string secret
- MTU 1500
After these configurations, the "IPsec site connection" status will change to "Active."

The VPN tunnel setup is complete. Now the information between the two instances will be transmitted securely.
Setting Up a VPN Tunnel Between VPNaaS and a Local MikroTik
For testing, we will need:
- A MikroTik with public and private networks.
- A client-server in the private network of MikroTik.
- An OpenStack router with a private interface.
Configuring the Necessary Policies for the OpenStack Subnet A (VPNaaS)
Step 1. Configuring the IKE Policy. Use the following parameters:
- Name ikepolicy
- Authorization algorithm sha1
- Encryption algorithm aes-128
- IKE version v1
- Lifetime value for IKE keys 86400
- Perfect Forward Secrecy group5
- IKE Phase1 negotiation mode main
Step 2. Configuring the IPsec Policy. Use the following parameters:
- Name ipsecpolicy
- Authorization algorithm sha1
- Encapsulation mode tunnel
- Encryption algorithm aes-128
- Lifetime value for IKE keys 3600
- Perfect Forward Secrecy group5
- Transform Protocol esp
Configuring the secure connection parameters for the OpenStack subnet side - Configuration of Site "A" (VPNaaS)
Step 3A. Configuring the VPN Service. Use the following parameters:
- Name VPNservice
- Router: select the router from the cloud project
Step 4A. Configuring the Endpoint Groups. Use the following parameters:
- Endpoint group name Type Value
- local_epg SUBNET 10.0.2.0/24
- remote_epg CIDR 192.168.0.0/24
Step 5A. Configuring the IPsec Site Connection. Use the following parameters:
- Name ipsecsiteconn
- VPN service associated with this connection VPNservice
- Endpoint group for local subnet(s) local_epg
- IKE policy associated with this connection ikepolicy
- IPsec policy associated with this connection ipsecpolicy
- Peer gateway public IPv4/IPv6 Address or FQDN 156.67.53.178 (Public Mikrotik)
- Peer router identity for authentication (Peer ID) 156.67.53.178 (Public Mikrotik)
- Endpoint group for remote peer CIDR remote_epg
- Remote peer subnet 192.168.0.0/24 (Local Mikrotik)
- Pre-Shared Key (PSK) string secret
- MTU 1500
After these configurations, the "IPsec site connection" will be successfully created and have the status "Down." When the tunnel is set up on the other side and successfully raised, the status will change to "Active."
Configuring the secure connection parameters for the MikroTik side - Configuration of Site "B"
Step 1B. Creating a Profile for Phase 1
To create via the graphical web interface, go to the "IP:IPsec" menu and click "Add New" on the "Profiles" tab.
Use the following parameters:
- Name VPNaaS
- Hash Algorithms: sha1 (must match the value set in the VPNaaS service)
- Encryption Algorithm: aes-128 (must match the value set in the VPNaaS service)
- DH Group: modp1536 (must match the value set in the VPNaaS service)
- Lifetime: 1d (must match the value set in the VPNaaS service)
To create via CLI, execute the command:
/ip ipsec profile
add enc-algorithm=aes-128 hash-algorithm=sha1 dh-group=modp1536 lifetime=1d name=VPNaaS
Step 2B. Creating a Proposal Entry for Phase 2
To create via the graphical web interface, go to the "IP:IPsec" menu and click "Add New" on the "Proposals" tab.
Use the following parameters:
- Name VPNaaS
- Auth. Algorithms sha1 (must match the value set in the VPNaaS service)
- Encr. Algorithms aes-128 cbc (must match the value set in the VPNaaS service)
- Lifetime 01:00:00 (must match the value set in the VPNaaS service)
- PFS Group modp1536 (must match the value set in the VPNaaS service)
To create via CLI, execute the command:
/ip ipsec proposal
add enc-algorithms=aes-128-cbc auth-algorithms=sha1 pfs-group=modp1536 lifetime=1h name=VPNaaS
Step 3B. Describing the Parameters of the Remote Peer
To create via the graphical web interface, go to the "IP:IPsec" menu and click "Add New" on the "Peers" tab.
Use the following parameters:
- Name VPNaaS
- Address: 94.103.11.88/32 (IP of the VPNaaS service (OpenStack R1))
- Profile: VPNaaS (previously created profile)
- Exchange Mode: main (must match the value set in the VPNaaS service)
To create via CLI, execute the command:
/ip ipsec peer
add address=94.103.11.88/32 exchange-mode=main profile=VPNaaS name=VPNaaS
Step 4B. Specifying the Identification Mechanism
To create via the graphical web interface, go to the "P:IPsec" menu and click "Add New" on the "Identities" tab.
Use the following parameters:
- Peer: VPNaaS (previously created peer)
- Auth. Method pre shared key
- Secret secret (must match the value set in the VPNaaS service)
To create via CLI, execute the command:
/ip ipsec identity
add auth-method=pre-shared-key peer=VPNaaS secret=secret
Step 5B. Creating an IPsec Rule Allowing Traffic from the Local Private Network to the Remote Local Network Through the Tunnel
To create via the graphical web interface, go to the "IP:IPsec" menu and click "Add New" on the "Policies" tab.
Use the following parameters:
- Peer VPNaaS (previously created peer)
- Tunnel checked (enable tunneling mode)
- Src. Address 192.168.0.0/24 (local network on the MikroTik side)
- Dst. Address 10.0.2.0/24 (local network on the VPNaaS service side)
- Action encrypt
- IPsec Protocols esp (must match the value set in the VPNaaS service)
- Proposal VPNaaS (previously created proposal)
To create via CLI, execute the command:
/ip firewall nat
add chain=srcnat action=accept place-before=0 src-address=192.168.0.0/24 dst-address=10.0.2.0/24
The secure connection is created.
Checking the Tunnel Status in MikroTik:
To view via the graphical web interface, go to the "IP:IPsec" menu:
On the "Installed SAs" tab, you should see two lines with the connection characteristics between peers.
On the "Policies" tab, the "PH2 State" item should have the value "established".
To view via CLI, execute the commands:
/ip ipsec
installed-sa print
To view via CLI, execute the commands:
active-peers print
(the connection state STATE should have the value "established")
The status of the "IPsec site connection" in VPNaaS has changed to "Active."